Saturday, November 28, 2009

Time for a crafty gift....

Sadly today is my last day as guest designer on Christmas with the Cricut.  You still have time to leave a comment over at Christmas with the Cricut, so you can be entered in the drawing for free prizes.  Not too mention seeing what those incredibly talented girls have posted for their crafty gift.   Also please check out Monique's blog...she is sooooo creative I am sure you will LOVE what she has created for today.   It has been such a fun week.  I hope everyone enjoyed the projects I created. 

Today's crafty gift is a 12x12 shadow box frame that I etched and layered with vinyl.


(this is a picture of me, my sister and my mom)


This is so hard to photograph.  Here in this corner is where I etched in 3 snowflakes from Winter Woodland cartridge and 2 scallops swirls that I flipped, rotated and welded together to create a corner.  I also placed rhinestones in the center of all 3 snowflakes.

For the word "family" I used the front from Winter Woodland.  I cut out the word family using the shadow feature @ 3" with vinyl and used etching cream to permanently etch the glass.  Next I cut out family in black vinyl @ 3" and layered on top of what I had etched.
(Once the etching cream was removed and washed, of course)


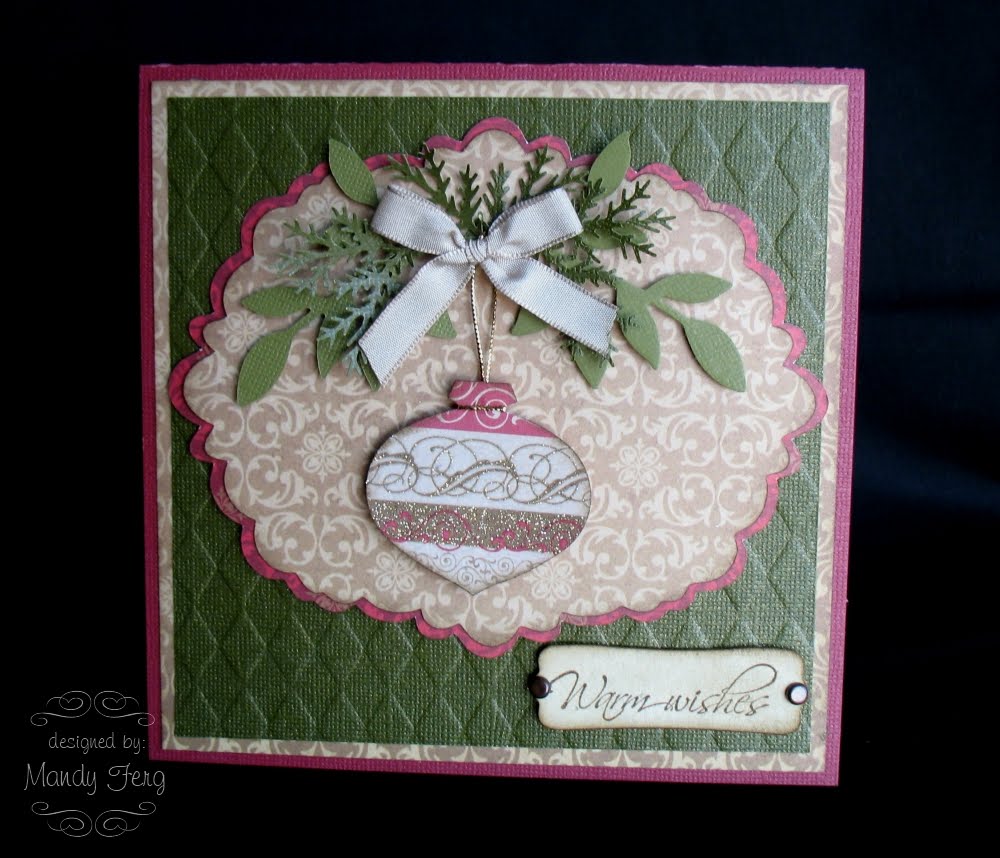
The paper used inside the frame is from the My Mind's Eye paper stack that I purchased at Michael's.  Ribbon is made by Bazzill and purchased from Archiver's.

Thank you so much for spending this week with me and celebrating my time as guest designer on Christmas with the Cricut.  Be sure to stay tuned in next week when I will continue to featured one Stampin' Up product each week and show you 3 different ways to use it.

Also if you LOVE Stampin' Up as much as I do, be sure to watch my blog starting in January.  It's sale-a-bration time, and I am going to be having LOTS of give a ways and another HUGE sale.  So be sure to mark your calendars!!  Thanks again for your kind words and support!

Friday, November 27, 2009

Happy Black Friday!

This is going to be a short and sweet post.  As I type this I have a house full of family waiting for me to finish up my post so we can write up our plan of attack for shopping.  (keep in mind, I just got back from doing a little shopping).

This week I am a guest designer for the fabulous blog called Christmas with the Cricut,  along with the ultra talented Monique.  Today is the day that we share a fancy card.  I'm not sure if mine is 'fancy' or not...I'll let you be the judge.  ;)


Patterned paper -  My Mind's eye
Cardstock -Soft sky by Stampin' up
Stamp - Whipper Snapper Designs, snowflakes SU! set
Accessories - SU! ribbon, dazzling diamonds glitter and liquid applique ( for snow) 
various copic markers and memento black ink
I cut the scallop hexagon & regular hexagon shape (both @3.5") from the Winter Woodland cartridge


Tomorrow is my last day as guest designer on CWTC.  :( 

I hope you stop back and join me for my last day.

Thursday, November 26, 2009

Happy Thanksgiving to everyone! Today is Scrapbook layout day!

It just so happens I have 2 layouts to share with you today.  Before I do that I just want to remind you to stop over at Christmas with the Cricut and make sure you leave a comment so you can be registered for the drawing for the FREE prizes and see what amazing layout the girls have posted today.   Also stop by Monique's blog to see her scrapbook page.  If it's anything like her layouts from the past...it will be FABULOUS!!!

Here is the first Layout:


Paper: American Crafts Merry Mint Collection
Cardstock: Stampin' Up and Coredinations      


Page is 12x12 with 4 squares cut to 5.5"x5.5" and sewn together
Photo mats are 4.25"x4.25" and 4.25x6.25         


Little boy, wagon and bows are all cuts from Everyday Paperdolls

Little boy 3.5"
wagon 3"
bows varied sizes all less than 1" (done on design studio) 

The santa hat is from paper dolls dress up.


The dog is from Everyday paper dolls he is cut at 4".  I also cut out a reindeer from paper doll dress up and cut off his antlers and attached them to the dog.  The nose is a little red button with red stickles on it.

I also applied flock to the dog by running him through my xyron machine and then sprinkled on the light brown flock, to give him a fuzzy feel and appearance.


Here is an up close of the zig sag sewing that holds the 4 blocks of cardstock together


The second layout is a much simpler layout:


Patterned paper:  Stampin' Up Christmas Cocoa
Cardstock : SU! real red, old olive and soft suede


Snowflakes are cut from the Winter Woodland cartridge @ 2.5"
I applied a coat of the White SU! Shimmer paint then added flat back pearls and rhinestones


Holly Leave is also from the Winter Woodland cartridge and is cut  @ 2", embossed with the cuttlebug swiss dots folder and distressed with Tim Holtz walnut stain distressing ink.


This reindeer is also from the Winter Woodland cartridge and is cut  @ 5" on SU! kraft cardstock and covered with a coat of SU! champagne shimmer paint (LOVE this stuff!!)  It is also inked around all the edges of the cardstock, even though it's hard to see on the page on the left.  There are also snowflakes stamped with real red ink on the background paper.  You just can not see it in the photos.  :(


Ribbon is from SU! (it is retired, but you can still order it from the clearance rack online through my website) it's called Alpine ribbon, you can see it here 

Well that's it for layouts!  I hope you enjoyed today's projects and if you have any questions feel free to e-mail me: ferg@new.rr.com

Hope you are having a great Thanksgiving! 

Wednesday, November 25, 2009

A gift box for my Mom....

Mom if you are reading this...stop right here, or you will spoil your surprise!  ;)
.
.
.
.
.
.
.

Ok....is she gone!??!?!  LOL!

As you all know I am guest designer on Christmas with the Cricut blog this week, along with the ultra talented Monique (see her fabulous creations here).

Today is the day that the girls on CWTC post a gift packaging project for us all to drool over and make us want a million crafty things we never knew we wanted.  Right!?!?!  If that alone is not a good enough reason for you to visit....what if I told you they are giving away tons of FREE stuff this week!?!?  Interested now??  Just leave a comment on their posts for this week and make sure you are a follower of their blog.  Just that easy. 

On more thing I am having a huge sale this week to celebrate my week as guest designer.  25% off your entire Stampin' Up order!!  Wow...that is HUGE....I know!  It's better than what us demos get!!  Just e-mail me your order ferg@new.rr.com (plus you can combine my sale with Stampin' Ups huge sale...how awesome is that!?!?)

Let's get to the goodies....


Now for the details.....


Here is what the box looked like before I started.  I bought at Hobby Lobby.

I used Stampin' Up Chocolate Chip craft ink to stain the wood, and Tim Holtz distressing ink in walnut to bring out the wood grain.


Next I traced the lid on to the back side of my paper (SEI Christmas Mint collection)
cut it out and glued it down with a coat of Mod Podge.


Then I used my Basic Grey file to file away the excess paper around the edges of the lid.

Next I measured the sides of the box and cut pieces to fit, and attached all four sides with a coat of Mod Podge.  (I also removed all the hardware before attaching paper)  I also applied a coat of mod podge to the top of all the paper.  This will protect the paper for years to come.   While that dried I created the poinsettia for the top of the box  :)


I cut out 11 poinsettias from the Winter Woodland cricut cartridge.  They started at 1" and each one increased in size by 1/2".  The largest poinsettia is 6" (the leaves are from the 6" poinsettia)


I used these embossing folders to emboss the flowers (oops I forgot one) .  Then used Tim Holtz distressing ink in walnut to bring out the texture in each of the flowers.  (Can you tell I love this ink pad??)


Starting with the largest flower I began layering the flowers using Stampin' Up dimensionals (the best dimensionals in the WORLD!!)  and just kept layering. 


I covered 3 small buttons with versamark ink and sprinkled with gold tinsel embossing powder.  Then added a dusting of champagne shimmer paint from SU! to the buttons and the edges of the flowers.

Lastly I tied red stitched ribbon from Bazzill around the lid of the box for a finishing touch.  

Tomorrow is scrapbook page layout day...and I have TWO 2 page layouts to share with you!!!

Hope you like what I shared today, and stop back in tomorrow.  


Tuesday, November 24, 2009

Day 2 Home decor...

Today is my 2nd day as guest designer on Christmas with the Cricut.  Whoo hoo!  Be sure to pop in and see what  the CWTC girls have posted to inspire us with today, and stop in by Monique and see what fabulous magic she has created today.  I am among such talented company!

This has to be one of my FAVORITE projects of all time.  Yes it took awhile...but I feel it was soooo worth it in the end.  The picture do not do it any justice. 

So what does 242 snowflakes get you???

besides a warm cricut blade....

A beautiful tree for your table or mantle...


You will need:
1 styrofoam cone (mine is 9''x3-7/8'')
 
I used 7 sheets of patterned paper.
1 to sheet to cover the cone
3 darker sheets for the first layer snowflake cut at 2.5"
3 lighter sheets cut at 2"
 I cut  all 6 sheets of 12x12 paper using the auto fill feature.
The snowflake I used is from the Winter Woodland


I used 2" corsage pearl ended pins (floral dept $3.99 for 100)
Start at the bottom and work your way all the way up to the top.  


Tie a ribbon at the top and attach with a pin and that's it!

Here is another version of the tree that I made using the single Holly leaf cut at 2"


This time I had to glue each leaf on which took a little longer.
I also embossed and ink each leaf for a little extra dimension. 
Then added red buttons with a hot glue gun.
Here is a closer look:


Guess what tomorrow is....besides hump day! 

It's gift packing day on CWTC. 

Be sure to stop in and see what I have created to hold my mom's Christmas ornament this year.

Shhhh...just don't tell her ;) 

Mom if you are reading this...NO peeking!!!  

Monday, November 23, 2009

Simple Card Monday!

Happy Monday everyone!!!!  Today is the first day of my week as guest designer with Christmas with the Cricut Blog.  If you haven't visited their website before....make sure you check it out!  Each week they give away fabulous prizes and the gals over there are super duper talented!  Also check out Monique's blog, she is guest designer with me this week and she is sooooo talented!!!  Here is a link to Monique's blog:  http://monkeydoodlecricut.blogspot.com/

On to today's card.  This is a 5"x5" card.


Scallop background shape is from the Winter Woodland cartridge cut at 4.25" and 4"
Ornament is punched from the Stampin' Up ornament punch {116794}
Sentiment is from a retired Stampin' Up set
Leaves- Stampin' Up sizzix die little leaves { 114511}
Background embossed with SU! texturz plates {114512}
Sentiment is from a retired Stampin' Up set
Sprayed with iridescent gold Glimmer mist spray  
Martha Stewart branch punch
Paper is Coredinations and DCWV Holiday Collection stack

I hope you enjoyed today's super simple card.  Check back tomorrow for a piece of home decor I promise you will LOVE!!!


Friday, November 13, 2009

Delightful decorations card

Happy Friday...and TGIF!!!  I am sooooo glad the weekend is here. Whew! 

Here is a quick card I made using the Stampin' Up Ornament punch {116794} and the coordinating stamp set Delightful Decorations {116517}.  Along with the Christmas Cocoa speciality paper from the Holiday Mini Catalog.


Wednesday, November 11, 2009

Ornament Punch 3-d Ornament

Happy Wednesday to everyone!

This week I am featuring the Stampin' Ornament punch {116794} and the coordinating stamp set Delightful Decorations {116517}

Today I made a few 3-d ornaments.  These are quick and easy to make and would be easy enough for kids to make for their Teachers. 


Punch out as many ornaments as you would like.  The more you use the fuller your ornament will be.


Score the ornaments down the middle.


Next I started to build the ornament, by gluing the folded sides together.  Once I got a few together I sprayed them with Glimmer Mist (Pearl) to give the ornament some shimmer.


I even like to spray my ribbon with glimmer mist. 
Just be sure to give it time to dry (or use the heat gun to dry)


Before gluing all the parts together put your ribbon or string in the middle. 


These were so fun and easy to make, I made one for my 13 year old daughter


I didn't have any pink zebra paper, so I colored 1/2 of my ornaments with my SU! Melon Mambo marker.


Next dilemma... I didn't have a pink bling.  So I colored a clear gem with my copic, let it dry. Worked great!


I hope you enjoyed today's project.  Monday's card will be posted soon.

Thanks!


Monday, November 09, 2009

A Halloween Layout

I am running behind on my projects, but have set aside some time tomorrow to get caught up.

Here is my 2 page 12x12 layout using the top note die for a journaling box. 


Paper is by Making memories.  I used the Designer calendar Cricut cartridge for the title, spider, and October 31st.   The punches used on the page is MS spider web and drippy goo edge punches.  Striped ribbon is by Stampin' Up.


Thanks for stopping by!

PS.  The snowman card directions are coming.  I started typing them up and realized this is a card that would be sooo much easier to show rather try to explain.  Now....I just have to figure out where DH put our video camera.  We moved in September and still have some boxes to unpack...I'm hoping it's in one of those boxes.